Are you faced with devices that seem beyond repair? Fear not! Microsoldering can be your saving grace. In this blog, we’ll walk you through some incredible hacks that can breathe new life into your once-bricked gadgets, using the art of microsoldering. Whether you’re a seasoned pro or a curious novice, you’re bound to find something exciting here.
1. Mastering the Art of Tracing Broken Connections
Discover how to identify and repair broken traces on circuit boards. Using a multimeter and some simple techniques, you can restore connections that are essential for your device’s functionality. Start by visually inspecting the board for obvious breaks or burnt areas. Once identified, use a multimeter to test for continuity across suspected broken traces. A beep indicates a good connection; silence means you have found your culprit. Bridges can often be built using conductive ink pens or even thin wire to restore the path. These DIY fixes are often quicker and more cost-effective.
For those unfamiliar, learning to trace these connections is surprisingly straightforward. Start by familiarizing yourself with the circuit’s schematic diagram. This blueprint provides an overview of how the trails are theoretically organized. Once you have this knowledge, the practical work becomes a form of art. Moreover, for added educational value, tech forums often offer guidance and community support to ensure you’re never truly alone on this journey.
2. The Magic of Reballing Chips
Learn the process of reballing to fix BGA chips that have lost their connection. This technique can solve issues with power, graphics, and more. In essence, reballing involves removing the solder balls under a BGA (Ball Grid Array) chip and replacing them with fresh, robust ones. It’s a meticulous process, demanding dexterity and precision. Begin by heating the chip to reflow the old balls, allowing for their easy removal. Then, using a stencil, new solder balls are placed and fixed, giving the chip a solid, reliable connection once more—something countless gamers attest maximizes their console’s potential.
While this might sound complex, don’t be intimidated. A number of reballing kits are available today, making the process achievable at home for dedicated enthusiasts. These kits often come with detailed instructions, making them accessible to newcomers to the art of microsoldering. Moreover, taking on such repairs isn’t just cost-effective; it’s an educational dive into electronic repair, giving you an intimate understanding of gadget anatomy and rejuvenating confidence in your DIY repair skills. Explore more about the benefits of microsoldering and step into this intriguing world.
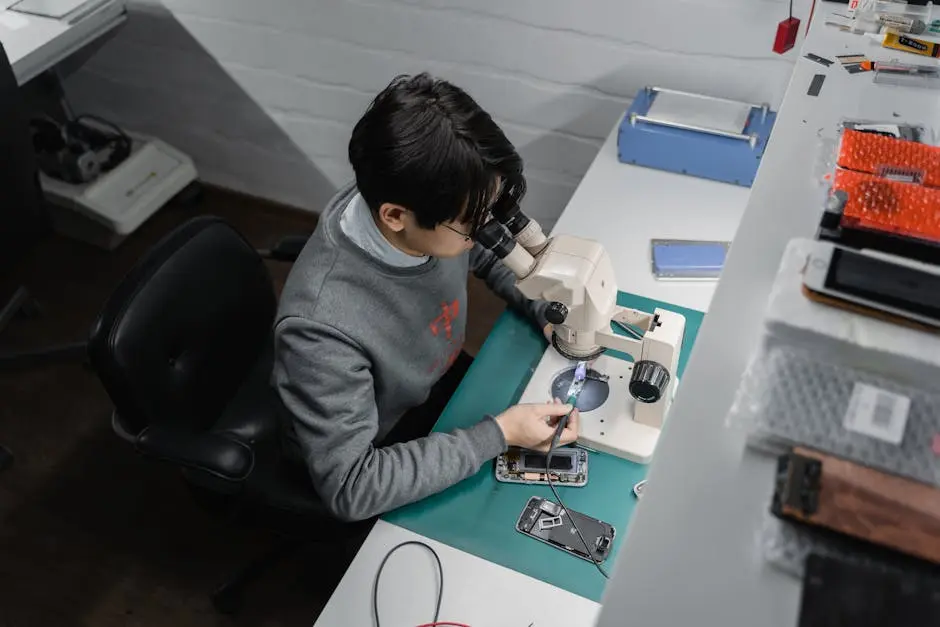
3. Conquering the Fear of Tiny Components
Micro components may seem intimidating, but with the right tools and approach, you can handle them like a pro. We’ll guide you through using tweezers and a steady hand to replace tiny parts. It all starts with the right magnification; a good set of magnifying goggles or a microscope will ensure you can see every detail with crystal clarity. Tweezers designed for electronic work provide the precision needed to manipulate these components. Practice steadying your hand, perhaps resting your elbow on a stable surface to avoid unnecessary movement. With time, you’ll find these once-daunting tasks as routine as changing a light bulb.
Still, confidence comes with practice—and patience is your greatest ally. As you take on these intricate tasks, you’ll realize that even the smallest adjustments can transform a device from nonfunctional to operational. Engaging with platforms that offer tutorials and step-by-step guides can bolster your skills and provide invaluable community insights. Remember, every microsoldering job starts with a single component, and each successful repair builds your repertoire and boosts your confidence.
4. Reviving Water Damaged Boards
Water damage doesn’t have to be the end. Discover effective microsoldering techniques to clean and repair waterlogged boards, restoring them to full function. First, disconnect and dry the device thoroughly—rice can aid in absorption, though specialized packets exist for speedier results. Once the board is dry, inspect for any corrosion or residue. It’s essential to clean these with isopropyl alcohol and a small brush. Gently brush away any corrosion around components and traces before investigating potential lift-offs in solder joints.
Water can cause shorts and disrupt precise circuitry pathways. Thus, checking for continuity with a multimeter after cleaning is critical. Often, the board will appear visually fine, yet malfunction; here, the art of diagnosis is key. Knowing where to look and what to test can turn a futile scenario into a salvaged masterpiece. Furthermore, engaging in these repairs yourself brings a contingency of pride and empowerment, especially when considering the environmental impact and cost of purchasing a new device.
5. Navigating the World of Custom Solder Jigs
Explore how custom solder jigs can simplify complex repairs, ensuring precision and stability as you work on intricate circuitry. These jigs hold components in place, freeing up your hands to focus on the task at hand—soldering. It’s like having an extra pair of hands, providing the stability needed to make clean and precise connections. When building or purchasing a jig, ensure it’s adjustable and compatible with various board sizes and types. This flexibility ensures you can tackle a multitude of projects without needing multiple jigs, keeping your workspace organized and efficient.
Custom jigs are particularly advantageous when working with densely populated boards or boards with uncommon geometries. They prevent unwanted movement during soldering, thus reducing the risk of overheating or bridges forming between solder points. While store-bought options are available, crafting your own can be a rewarding project. Tailoring its dimensions and functionalities per project ensures specificity and accuracy. Delve into online forums or repair blogs for inspiration, where fellow technicians often share insights into their custom creations, perpetuating communal learning and growth.
6. Solder Mask to the Rescue
Solder mask is not just for protection. Learn how to use it creatively to fix issues on your circuit boards, providing insulation and ensuring connections stay intact. While typically applied to prevent solder bridges, its role extends to safeguarding connections post-repair. Imagine applying a fresh layer of mask post-solder; it’s akin to sealing a polished surface with varnish—extending life and aesthetics. Use it to insulate errant electronic paths or fortify existing solder joints. The flexibility of solder mask offers solutions within solutions, even acting as a stopgap in aging boards.
Applying solder mask can be an art form. It requires a clear understanding of the areas that need protection versus those requiring freedom for connectivity. Happily, tutorials online abound, offering insights from trusted sources, facilitating the deep dive into mastering the subtleties of the perfect overlay. When correctly applied, a solder mask is a shield that defends your hard work, fostering longer device lifespans and avoiding unnecessary replacements.